If you work in industrial piping, plumbing, or commercial construction, you know pipe nipples are the unsung heroes of every solid piping system. They’re the short, threaded pipe segments that connect fittings, valves, and equipment, and their accuracy can make the difference between a leak-free installation and a costly callback. As a supplier who’s worked with plumbers, pipefitters, and plant maintenance teams for over 12 years, I’ve seen firsthand how even small mistakes in cutting a pipe nipple to size can derail a project, waste material, or force you to scramble for a replacement at 2 a.m. Today, I’m breaking down the science and step-by-step process of cutting a pipe nipple to the exact size you need—plus a few tips I’ve learned from the field to avoid common missteps. Pipe Nipples
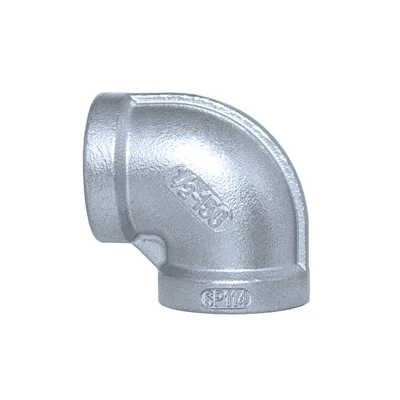
First, let’s get clear on what a pipe nipple actually is, because sizing for these parts isn’t the same as sizing full-length pipe. A standard pipe nipple is defined by its outer diameter (OD) for non-threaded portions, the number of threads on each end, and the total length measured from the very end of one male thread to the very end of the other male thread. That’s non-negotiable: if you measure from the shoulder of one thread, you’ll end up with a nipple that’s too short, and threading it will leave a gap that leaks. Even a 1/8-inch error in total length is enough to cause a pipe to pull away from a fitting, so precision here matters.
Before you pick up any tool, you need to nail down two critical details: your pipe material and the final specs of the nipple. Pipe nipples come in carbon steel, stainless steel, brass, and even PVC, and each material reacts differently to cutting tools. For example, cutting carbon steel with a high-speed steel blade works fine, but stainless steel requires a bi-metal or carbide blade to avoid premature dulling. PVC, on the other hand, can crack if you use a abrasive saw that generates too much heat, so you’ll need a fine-tooth blade and extra support. I always tell new customers: if you’re not sure what material your project uses, double-check before buying tools—wasting a $20 blade on the wrong pipe is a simple way to throw your timeline off.
The first step in the process is pre-measuring, and this is where most people mess up. Let’s walk through it properly. Grab a flexible tape measure, a combination square, and a permanent marker (not a pencil—pencil marks smudge when you’re cutting, and a misplaced mark is a recipe for error). First, lay your length of pipe flat on a workbench or sawhorses, making sure it’s completely straight. Warped pipe will throw off your cut, so if you have a bowed piece, either straighten it gently with a pipe vise or set it aside to use for scrap.
Next, mark your cut line. Remember: your pipe nipple’s final length is measured from the end of one thread to the end of the other, so you need to account for how much length you’ll lose when you cut. When you cut pipe, the saw blade creates a kerf—the thin strip of material that gets removed. For a 14-inch nipple, for example, if your cut removes 1/8 inch of material, you need to mark your starting pipe as 14 1/8 inches from the end, so after cutting, you end up with a 14-inch finished nipple. That’s a small but essential detail that even seasoned pipefitters miss occasionally.
Once you have your mark, clamp the pipe securely in a vise. Don’t just tighten it until it’s snug—you want it rigid enough that it won’t shift during cutting, but not so tight that you deform the pipe (deformed pipe won’t thread correctly). For small-diameter pipe (1/8 inch to 1 inch), a regular vise with soft jaws works fine; for larger diameters (1 1/4 inch and up), use a pipe vise with grooved jaws to prevent slippage. I’ve seen a pipe shift mid-cut and turn a perfectly good piece of pipe into scrap—avoid that extra waste by taking the time to clamp it right.
Now, choosing the right cutting tool is half the battle. There are four main tools pipe nipple suppliers and fitters use, each with pros and cons depending on your project size and material. Let’s break them down:
-
Hacksaw: The classic hand tool. Great for small jobs, tight spaces, or when you don’t have power tools on hand. A 10-inch hacksaw with 18 to 24 teeth per inch (TPI) works for steel; for stainless steel, go with 24 to 32 TPI, and for PVC, 14 to 18 TPI prevents cracking. The downside is it’s slow—cutting a 1-inch steel pipe with a hacksaw takes about 2 to 3 minutes, and it’s easy to get an uneven cut if your hand slips. But it’s portable, cheap, and perfect for on-the-spot small cuts.
-
Pipe Cutter: Also called a tube cutter, this is the go-to tool for small-diameter pipe (up to 2 inches) made of steel, brass, or PVC. It has a sharp cutting wheel that scores the pipe, then you tighten the handle to roll the cutter around the pipe, deepening the score until the pipe snaps. The result is a clean, square cut with very little burr, and it’s fast—usually takes 30 seconds per cut. The only catch: it doesn’t work well for pipe larger than 2 inches, and the cutting wheel can dull quickly if you use it on hard materials like stainless steel without a specialized wheel.
-
Power Hacksaw or Circular Saw: Power tools are ideal for high-volume jobs, like when you’re cutting dozens of pipe nipples for a large construction project. A power hacksaw with a carbide blade makes quick work of steel and stainless steel, while a circular saw with a fine-tooth blade works for PVC and fiberglass pipe. The key here is to use a vise or cutting guide to keep your cut square—even a 2-degree angle can make threading the nipple impossible. Always wear eye protection and a dust mask when using power tools, especially for cutting metal, which creates sharp shavings.
-
Threading and Cutting Machine: This is the tool professional suppliers and large contractors use. It cuts pipe to exact length, then threads both ends in one pass. The machine takes the guesswork out of sizing: you set the desired length, and it cuts and threads automatically, resulting in a consistent, square cut every time. If you’re a supplier like us, this machine is essential for keeping up with orders—no more measuring each nipple by hand, no more errors. The downside is it’s large and expensive, so it’s more suited for commercial use than small DIY projects.
No matter which tool you use, the next step is cutting safely and accurately. When using a hacksaw or pipe cutter, apply steady, even pressure—don’t force the blade or wheel, as that can cause it to break or create an uneven cut. For power tools, let the blade reach full speed before you start cutting, and don’t push too hard; let the blade do the work. After cutting, you’ll have a sharp burr on the inside and outside of the pipe end. This is critical to remove: if you don’t deburr, the burr will prevent the threader from cutting properly, and it can also restrict water flow (in plumbing applications) or damage gaskets. Use a deburring tool or a wire brush to remove the burr, running it around the inside and outside of the cut end until it’s smooth to the touch.
Once you’ve cut and deburred your pipe nipple, you’ll need to thread both ends unless you’re purchasing pre-threaded nipples from a supplier (like us—pre-threaded nipples save you time and ensure consistent threading specs). But if you’re threading it yourself, here’s a quick tip: use a thread-cutting oil or lubricant for metal pipe, especially stainless steel or brass. The lubricant reduces friction, prevents the die from breaking, and creates a smoother, leak-proof thread. For PVC, you don’t need lubricant, but you should use a plastic-specific thread die to avoid cracking the pipe.
Now, let’s talk about common mistakes that lead to bad pipe nipples, because even if you follow every step, these missteps can ruin your work. First, not accounting for the kerf. I mentioned this earlier, but it bears repeating: if you cut a 1-inch steel pipe with a hacksaw that has a 1/8-inch kerf, a 10-inch length of pipe will result in a 9 7/8-inch nipple. Always add 1/8 inch to your starting length for hand tools, and check your power tool’s blade kerf if you’re using one. Second, cutting the pipe at an angle. A cut that’s even slightly off-square will make threading lopsided, leading to leaks or a nipple that won’t fit. Using a combination square to mark your cut line, and a cutting guide for power tools, eliminates this issue. Third, skimping on deburring. A small burr that’s barely visible can cause a 5% loss in flow, and in high-pressure systems, that’s enough to cause a rupture. Fourth, measuring wrong. If you measure the nipple length from the shoulder of the thread instead of the end, you’ll end up with a nipple that’s too short. Always confirm your measurement standard: for our pipe nipples, every spec is “end to end” of male threads, so when you place an order, you don’t have to adjust for anything extra.
As a supplier, we see customers come to us all the time because they messed up cutting a nipple and need a replacement fast. That’s why we offer pre-cut, pre-threaded pipe nipples in standard sizes, and we can custom-cut and thread any size you need for your project. Whether you need a 2-inch carbon steel nipple for a factory line, a 1/4-inch brass nipple for a plumbing repair, or a 6-inch stainless steel nipple for a food processing plant, we have the materials and machinery to deliver accurate, consistent parts. We also include a free sizing guide with every order, so you can double-check your specs before you install, and our team is always available to help if you have questions about fitting, material, or cutting.
If you’re a do-it-yourselfer tackling a small plumbing project, remember that patience is the key. Take your time measuring, clamping, and cutting—rushing is where mistakes happen. If you’re a contractor or facility manager doing high-volume work, investing in a small threading machine or relying on a trusted supplier like us will save you time, money, and the headache of callbacks. Pipe nipples might seem like a trivial part, but they’re the backbone of any piping system, and getting them right is what keeps installations running smoothly.
Whether you’re cutting your own pipe nipples or sourcing them from a supplier, the process boils down to precision, preparation, and using the right tools for the job. Don’t cut corners on measuring, don’t skip deburring, and always account for your tool’s kerf. At the end of the day, a perfectly cut pipe nipple is worth the extra 10 minutes of work—it’s the difference between a job done right and one that needs redoing. If you’re ready to order pipe nipples for your next project, reach out to our team to discuss your exact needs, and we’ll help you get the right parts at the right size, every time.
Heavy Pattern References
- Pipe Fabrication Institute. (2018). Standard Practice for Pipe Nipple Fabrication. PFI ES-22.
- American National Standards Institute. (2020). Standard for Pipe Threads, General Purpose (Inch). ANSI B1.20.1.
- OSHA. (2021). Power Tool Safety Guidelines for Construction and Industrial Work. OSHA 3067.
- International Plumbing Code. (2022). Chapter 7: Pipe Installation and Fitting. ICC.
United Brothers Metal Products Co., Ltd.
United Brothers Metal Products Co., Ltd. is one of the most professional pipe nipples manufacturers and suppliers in Vietnam. We are committed to providing high quality customized products with competitive price. Please feel free to buy bulk durable pipe nipples in stock here from our factory. Also, pricelist is available.
Address: Lot 61c2, 99a, 99b Long Giang Industrial Park, Tan Phuoc 3 Commune, Dong Thap Province, Vietnam
E-mail: sales@ubfittings.com
WebSite: https://www.ubvalves.com/
